Getting Started Stable
Whether you’re a new modder or need to brush up on the basics, this is the place to be. This page will focus on what you need to begin making a mod.
If you’re a beginner, we recommend reading this page from top to bottom twice before moving on to anything else. However, if you’re here for something specific, you can jump to the desired section by clicking on one of the following..
What’s Needed?
PhxTool / PhxGUI – For Extracting Halo Wars: DE Content
The backbone of Halo Wars modding is PhxGUI, a drag-and-drop tool that lets you unpack, convert, and rebuild Halo Wars .era archives, which store nearly all of the game’s resources like units, art, XML data, sounds, and UI.
You’ll use this tool to:
- Extract
.erafiles just drag them into the tool to unpack their contents. - Convert
.xmbto.xmldrag individual files or entire folders into the tool. - Rebuild archives drag the
.eradefmanifest file back into the GUI. - Patch your game executable allows loading modded
.erafiles.
Each .era file holds different types of content, and every map has its own .era. You can extract only the map you want to modify, or dump them all together for a full modding base.
If your extracted files show up as example.xml.xmb, it means they’re still compressed. You need to drag the whole folder into PhxGUI to properly extract them.
For advanced options, error handling tips, and in-depth info, check out the full PhxGUI documentation.
A Decent Text Editor

Almost all of Halo Wars data files are in .xml. So with that in mind, it’s a good idea to install and use a text editor with syntax highlighting.
Notepad++ Visual Studio Code Sublime Text 3
Notepad++ and Visual Studio Code are completely free, and Sublime Text 3 has an indefinite trial period. All three are excellent programs to edit .xml files. If you have another program that you prefer, you can use that, of course. They are just text files after all.
A Little Bit of Patience
As with all things, sometimes you may encounter something that is not working as expected. If this is the case, don’t give up! Just make sure to double-check everything. Some things that can cause unwanted results are:
- Invalid XML formatting
- XML entries with duplicate
Name=""attributes - Incorrect spelling or forgotten underscores
When following a guide here, if you’re absolutely sure you did it correctly and it still will not work, there is always the Halo Wars Modding Discord where someone would be happy to assist you.
Creating Your First Mod
Now that you are familiar with the tools, let’s make a mod. The mod we will be creating here is simply increasing the population count (the number of units you can have in your army) and changing the unit that spawns at your base when you start a game (the default is the warthog, ghost, or brute chopper).
Setting Up ModManifest
First things first.
ModManifest is a .txt file that tells the game where to load external content from. This file can automatically be found and opened using PHXTool, or alternatively can be found in:
| Distribution | Path |
|---|---|
| Steam | C:/Users/Username/AppData/Local/Halo Wars |
| Windows Store | C:/Users/Username/AppData/Local/Packages/Microsoft.BulldogThreshold_8wekyb3d8bbwe/LocalState |
| Steam Deck | /home/deck/.local/share/Steam/steamapps/compatdata/459220/pfx/drive_c/users/steamuser/AppData/Local/Halo Wars |
Inside of your ModManifest.txt file, you can specify paths for the game to load mods from. Each path must be on its own line. To disable a path without erasing it, simply put a semi-colon (;) in front of it. PHXTool has a GUI to automate this process, if you prefer it. It can be accessed by pressing the Edit ModManifest.txt for (Distribution) button. This button will also create the file if you do not have one already.
The Windows Store version of the game can ONLY load mods from folders in C:/Users/Username/AppData/Local/Packages/Microsoft.BulldogThreshold_8wekyb3d8bbwe/LocalState.
The Steam Deck version of the game can ONLY load mods if the game is installed on the main drive and not on an SD Card.
For the Steam version, however, mod folders can be placed wherever you want, even on another drive if you have one.
Go ahead and create a folder within the confines of your game version, and put the path of this folder in the ModManifest.txt.
Getting Into It

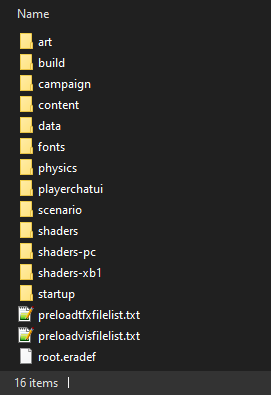
First, make sure you have set your expand path. Once you have verified that it is set where you want it, simply locate the root.era file in your game’s installation directory and drag it into PHXTool. PHXTool will now unpack the archive. Once it is done, your expand path should look like the image on the right.
The file we’re after now is the leaders.xmb in the data folder.
Once you find this file, drag it into PHXTool just as you did the root.era before. You will notice it creates an .xml file right next to the original .xmb named leaders.xml. Now, go to your mod folder and create a folder named data. We do this because the contents of the mod folder need to mimic that of the archives the game uses. This means that any file we want to put into our mod must still work within the file structure the game uses.
Copy the leaders.xml into your new (mod)/data folder.
Note: any file in your mod directory that has the same path and name as one from the base game will overwrite the original. In this case, we’re overwriting the data/leaders.xml file. This file will be treated as the only one that exists upon loading into the game.
Now, open the leaders.xml file that you just copied to your (mod)/data folder. In this file, you will see several <Leader> nodes. These nodes contain all of the information the game uses for each specific leader, including their name, starting unit, and starting resources.
The one we’re after is the one with Name="Cutter".
It will look like this:
<Leader Name="Cutter" Icon="ui/game/icon/unsc/leader/Captain Cutter" LeaderPickerOrder="2" StatsID="1" DefaultPlayerSlotFlags="0x81">
  <Civ>UNSC</Civ>
  <Tech>unsc_LeaderCutter</Tech>
  <NameID>7000</NameID>
  <DescriptionID>7001</DescriptionID>
  <FlashCivID>0</FlashCivID>
  <FlashImg>orbital</FlashImg>
  <FlashPortrait>img://art/ui/flash/shared/textures/pregame/leaderImages/cutter.ddx</FlashPortrait>
  <UIControlBackground>img://art/ui/flash/shared/textures/leaders/LeaderPict_cutter.ddx</UIControlBackground>
  <Resource Type="Supplies">800</Resource>
  <Resource Type="CampaignFoo">0</Resource>
  <Resource Type="Collectable">0</Resource>
  <Resource Type="Power">0</Resource>
  <StartingUnit Offset="0,0,0" BuildOther="unsc_bldg_command_03" DoppleOnStart="true">game_base_socket_01</StartingUnit>
  <StartingSquad FlyIn="false" Offset="60,0,-20">unsc_veh_warthog_01</StartingSquad> <!-- CHANGE THIS LINE -->
  <RallyPointOffset>50,0,0</RallyPointOffset>
  <RepairRate>1</RepairRate>
  <RepairDelay>20</RepairDelay>
  <RepairCost Type="Supplies">35</RepairCost>
  <RepairTime>30</RepairTime>
  <Pop Type="Unit" Max="99">30</Pop> <!-- CHANGE THIS LINE -->
  <Pop Type="Spartan" Max="3">3</Pop>
</Leader>
First, let’s check out the line <Pop Type="Unit" Max="99">30</Pop>.
This line determines the starting population (the value within the node), as well as the maximum value it can be (the value of the Max attribute).
Go ahead and set the value within the node (here it is 30) to whatever you want.
While we’re here, let’s find the line:
<StartingSquad FlyIn="false" Offset="60,0,-20">unsc_veh_warthog_01</StartingSquad>
This line’s value can be set to any squad name from squads.xml, but for now, try just changing it to unsc_inf_marine_01. This will set the starting unit to the marine squad.
Now try starting your game!
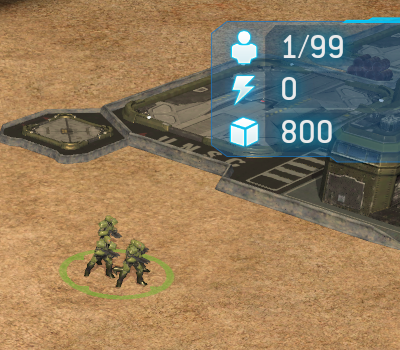
If all went well, when you start a skirmish mission as Captain Cutter, you should notice that your population capacity is whatever you set it to before (here I set it to 99, hence 1/99), and now you also start with a marine squad rather than a warthog!
This was just a simple file edit to get you familiar with how the modding environment is set up.
For more in-depth tutorials, please see the Guides tab on the left of the page! There is so much more that can be done!